
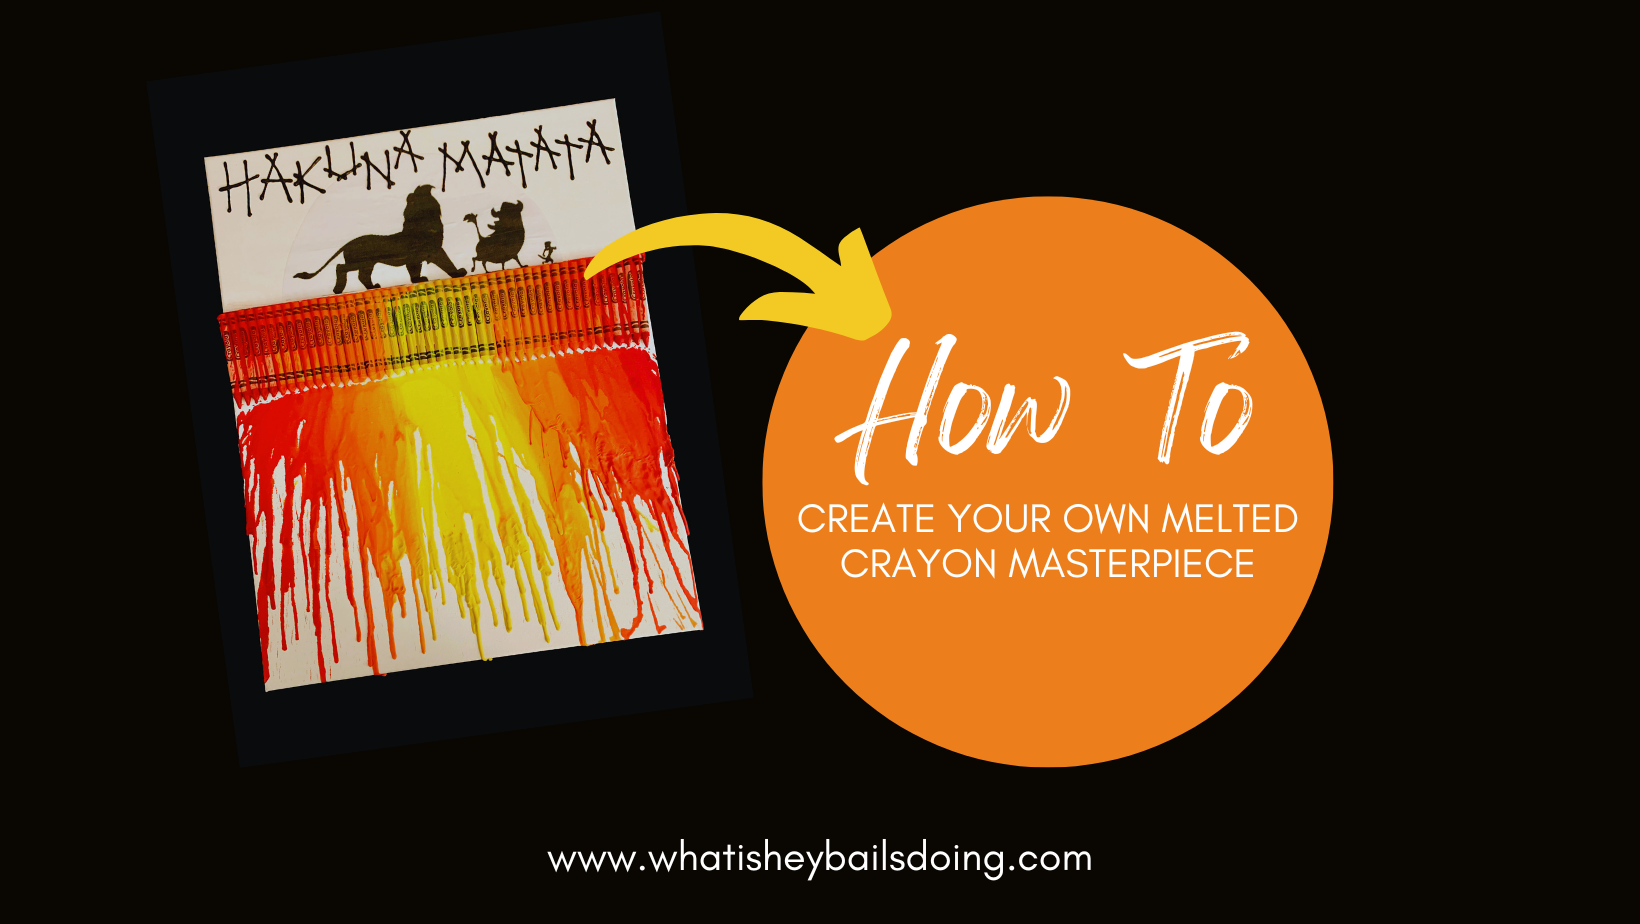
I’m a huge Disney fan and during the pandemic I had a lot of free time on my hands, so I decided to bring a long-time idea of mine to life! Melted crayon art is very easy and super fun to create, plus it’s relatively cheap (minus the canvas unless you are able to score one on sale or at a local art thrift store, such as Texas Art Asylum) as Crayola crayons run from $1 – $1.50 for 8, 16 or 24-packs. I always use Crayola brand crayons for this type of project as they are better quality than some of the cheaper brands that you might find at Walmart or Dollar Tree.
Deciding on which count of crayon packs to purchase begins with your design – if you’re looking to recreate my “Hakuna Matata” art in the exact same design, you’ll need to purchase 16-packs as the 8-packs don’t have enough variety of the warm colors to create the sunset. If you’re interested in changing things up or creating a completely different design, I encourage you to try using the crayons found in the 24-pack as you’ll have a wider variety of colors to utilize. Feel free to tag @whatisheybailsdoing on Instagram with your final product!
Materials Needed
- 24″ x 30″ Canvas art board
- 16-pack of Crayola crayons – at least 10 boxes in total, possibly more if you have a larger canvas
- Hot glue gun
- Masking tape or painters tape
- Printout of Lion King characters’ silhouettes or Cricut cutout version
- Mod podge (if using a paper print out) or black sticker paper for Cricut cutout
- Black puffy paint
- Hairdryer
- Ruler
- Newspaper (for covering the floors)
Instructions
Start by sorting your crayons into 5 different piles: red, red-orange, orange, yellow-orange and yellow. Next, locate where you want your line of crayons to be on your canvas. I chose to place mine roughly 10 inches from the top to ensure that I had enough space for both the silhouettes and the phrase. You can definitely add more space to the top, but I recommend not going any closer than 10 inches.
Using a ruler (or additional object with a straight edge), draw a line across your canvas to help guide you on where to glue the crayons. Optional: draw a second line roughly 5 inches below this first line for additional help keeping the crayons straight. Heat up your hot glue gun so that it’s ready to go! While it’s heating up, you’ll start creating your crayon layout.
Crayon Layout
Starting with the red crayons, place one on each outer edge of the canvas, using the line(s) you drew as a guide to keep them straight but do not glue yet. Continue placing the red crayons on the outer edge moving inwards, bouncing from one side to the other like ping-pong until all of the reds are on the canvas. Repeat this same process with the rest of the colors in the following order:
- Red [outermost edge crayons]
- Red-Orange
- Orange
- Yellow-Orange
- Yellow [center crayons]
Feel free to sort the crayons around per your own artistic preference. Once you’ve got the crayons laid out and are happy with it, begin gluing them to the canvas by picking up one at a time, swiping a line of hot glue down the crayon then placing it back in line on the canvas. My opinion is that it’s best to sweep from either left to right or right to left, just as long as you’re moving in the same direction the entire time. Doing so makes it easier to correct any shifting that could occur during this process.
Optional: I place the glue on the back of the crayon, allowing the word “Crayola” to be facing outwards, creating a neat and tidy little row of crayons. This is completely optional and based on personal preference, but the perfectionist in me required that I do it. ?

Once you have all of the crayons glued to the canvas, grab your masking tape and use it to cover the entire area lying above the line of crayons, placing at least 2-3 extra tape strips directly above the crayon line to help avoid any upward bleeding. It’s important that you use masking tape or painters tape as this tape is only here to shield any excess crayon wax from escaping upwards on the canvas. These types of tapes are specifically designed to easily peel off once its purposed has been served, so save your duct tape and clear scotch tape for other projects.
Melting the Crayons
Now that you’ve glued on your crayons and have taped up the blank space above them, you’re ready to start melting!! Find a spot near an outlet (outdoors is the safest option – I melted my crayon canvas in the garage) and lay down newspaper to avoid getting crayon wax all over the place. Turn the hairdryer on the hottest setting and let the fun begin! ? Start by holding the hairdryer over the tips to allow the crayons to start dripping, then slowly begin shifting the hairdryer in a downward direction to help control the wax streams. Check out the time-lapse video below to see the angle in which I’m pointing the hairdryer – this is key! If you start angling the hairdryer any which way, you’ll start to cause the colors to mix and that defeats the purpose of this sunset look.
Continue melting the crayons until you’ve achieved your desired look then let dry. Next, remove the masking tape from the top. I didn’t place enough tape near the crayons on my canvas, so some of the wax leaked through. I fixed this by painting over these excess smudges with white paint. Now you’re ready to add the finishing touches!


Adding Character Silhouettes – Paper Printout Version
If using the paper printout of the Lion King characters (this is what I did as I didn’t have a Cricut when I created this masterpiece), carefully cut a straight line across the paper at the feet of the characters. Next, cut a half-circle to create what might appear to be a sun. Bonus look: print the silhouettes on yellow paper so that it looks like the sun is really behind the characters! I wish I would’ve thought of this back then. ?
Using a foam paint brush, paint a layer of Mod podge on the canvas directly above the line of crayons. Quickly place the freshly-cut printout on top of the wet Mod podge, directly in line with the top of the crayons, giving the illusion that the characters are walking on a “crayon bridge”. Lightly paint an additional layer of the glue on top to seal it into place. Let dry overnight.
Adding Character Silhouettes – Cricut Cutout Version
Use your Cricut to cut the silhouettes on black sticker paper. Carefully remove the oversized sticker and place it directly in line with the top of the crayons, giving the illusion that the characters are walking on a “crayon bridge”.

Final Step
Using the puffy paint, write out “Hakuna Matata” above the silhouettes. You can write in whatever script you feel most comfortable using, although I chose a stick-looking-font because I felt that it fit perfectly with this jungle theme. If you have a Cricut, feel free to skip the puffy paint and cut out these words in any font that you want! Have fun and get creative with this. ?

You’re so awesome! I don’t believe I have read a single thing like that before. So great to find someone with some original thoughts on this topic. Really.. thank you for starting this up. This website is something that is needed on the internet, someone with a little originality!
Thanks so much for your kind words! I’m glad that my efforts are appreciated.
I just like the helpful information you provide in your articles
Happy to provide! Thanks for stopping by and sharing your thoughts.